16 Kasım 2013 Cumartesi

2 Kasım 2013 Cumartesi

Time to get our hands dirty with a bit of programming. There's no putting it off any longer, I'm afraid! We'll create a new project for the next section.
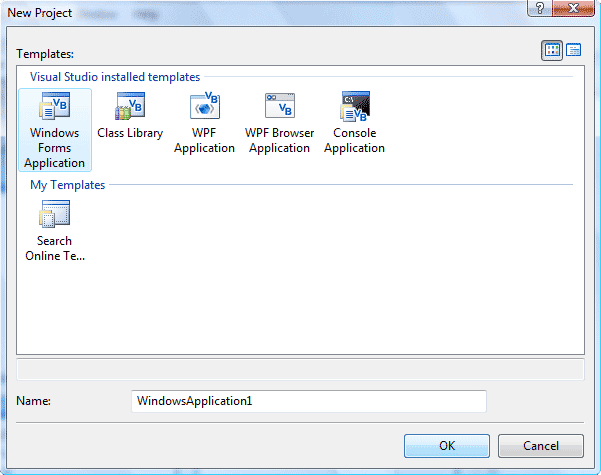
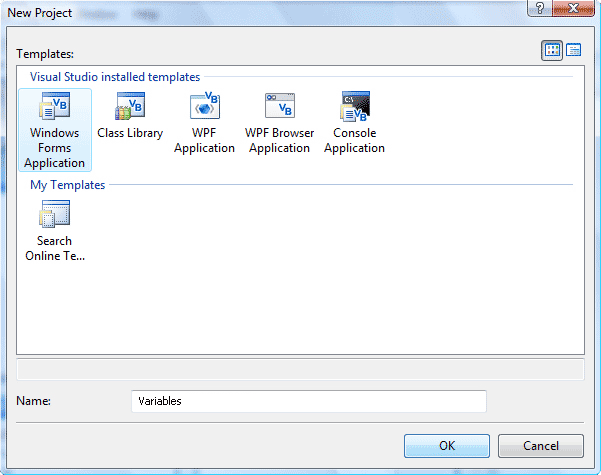
So, if you already have you VB NET software open, you can get rid of the current project by clickingFile from the menu bar. From the drop down menu, choose Close Project (Close Solution in Visual Studio 2012). You will be returned to the Start Page. Click File > New Project from the menu bars. When you get the dialogue box popping up, choose Windows Forms Application at the top. Then change the Name from WindowsApplication to Variables:
Version 2008
The new project dialogue box in VB NET 2008

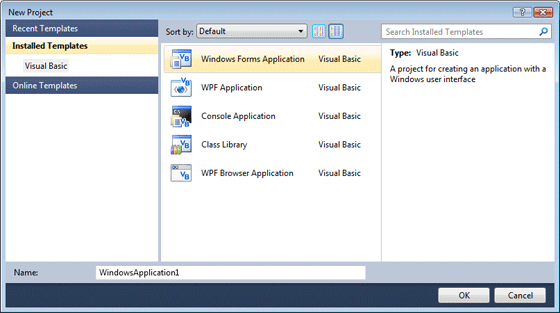
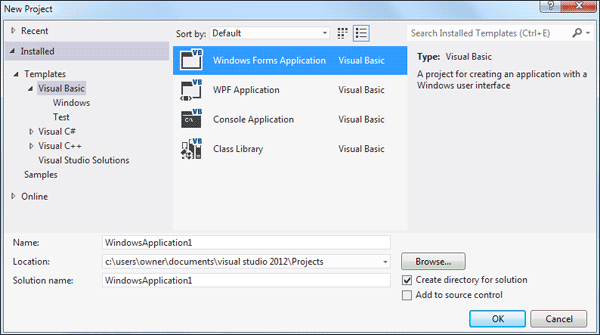
Version 2010/2012
The new project dialogue box in VB NET 2010
When you click the OK button, a new form will appear.
If you look at the Solution Explorer at the top, you'll see the name of the project has changed to the Name you gave it.
The Solution Explorer showing the name of the project
The name of the Project is now Variables - the same name as the folder that is created for you to hold all your project files.
Now that you have a new Project started, we can discuss Variables. We'll do that in the next section.

http://www.homeandlearn.co.uk/NET/nets1p9.html
If you have a look in the top right of the Design Environment, you'll see the Solution Explorer. (If you can't see it, click View > Solution Explorer in version 2008 and View > Other Windows > Solution Explorer in version 2010.)
VB .NET Solution Explorer
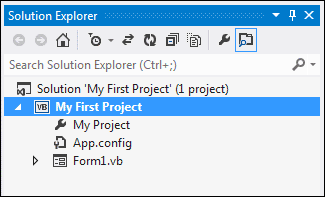
The Solution Explorer shows you all the files you have in your project (Notice that the name of your project is at the top of the tree - "My First Project"). The Solution Explorer in version 2012 is slightly different. It looks like this:
Solution Explorer in VB NET 2012
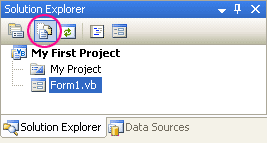
At first glance, it looks as though there are not many files in the project. But click the Show All Files icon, circled below:
The All Files Icon
Show All Files in VB NET 2012
When you click Show All Files, the Solution Explorer will look something like this:
All the files in the project are displayed
All Files displayed in the Projects, VB  NET 2012
When you save your project, you are saving all these files.
To save your work, click File > Save All and you'll see the following dialogue box (you won't see a Save Project dialogue box in version 2012 - it just saves your files):
The files are usually saved in the My Document folder in XP (Document folder in Vista and Windows 7/8), under Visual Studio. If you want to save your projects elsewhere, click the Browse button.
To actually save your work as you go along, just click File > Save All from the menu bar. Or press Ctrl + Shift + S on your keyboard. Or click the icon in the Toolbar (the stack of floppy disks). If you save often then you won't lose any of your work if anything goes wrong with your computer.

In the next section, we'll get down and do a bit of actual programming. It's a gentle introduction, so nothing to get too worried about!

At the moment, our form looks a little bland. Time to liven it up with a splash of colour.
Changing the colour of the Form means we have to change one of its properties - the BackColor property.
So click anywhere on the form that is not a textbox or a label. If you do it right, you should see the sizing handles around the edges of the grey form. The Property Box on the right will read "Form1", and that indicates that you have indeed selected the form. When the Form is selected you can change its properties.
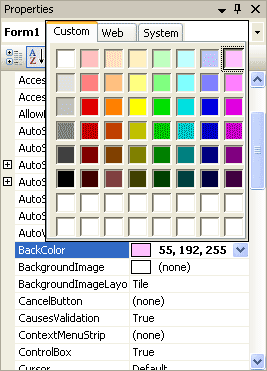
To change the colour of the Form, click the word "BackColor" in the Property Box. Next, click the black down-pointing arrow to the right. A drop-down box will appear.
BackColor Properties
The default colour is the one selected - Control. This is on the System Tab. The System colours are to set whatever colour scheme the user has opted for when setting up their computers. For example, you can use the Display Properties dialogue box in Windows XP to change how things like menus and buttons look. Someone who is colour-blind might have changed his or her settings in order to see things better on the computer screen. If you stick with the System colours then a colour-blind user of your programme would not have any problems seeing your master work.
As you can see in the image above, you can choose the colour of the Active Caption. The Active Caption is the one you set earlier when you changed the text to "My First Form". The Active Caption is blue on my computer, and the Active Caption Text is white. It might be different on yours.
If you want to choose a colour that is not a System colour, click the Custom Tab. You'll then see this:
Custom Colours
Click on any of the Colours in the colour palette and the background colour of your form will change.
You can also select the Web Tab. When you do, you'll see a list of Web-Safe colours to choose from. A Web-Safe colour is one that displays correctly in a web browser, regardless of which computer being used (that's the theory, anyway). You might want to use a Web-Safe colour if you're designing a project for the internet. But you can choose one even if you're not.


To change the colour of the labels, click on a label to select it. Look in the Property box to see if it reads Label. If so, you can now go ahead and change the BackColor property of the Label in exactly the same way that we changed the BackColor property for our Form.
Change the colour of the other two labels to anything you like. To change the colour of more than one Label at a time, click on one Label to select it. Now, hold down the "Ctrl" key on your keyboard and click another Label. You'll see that two Labels now have sizing handles around them. Click the third Label with the "Ctrl" key held down, and all three Labels will be selected. You can change the BackColor property of all three at once.
If you want to change the Font size of the Labels and Textboxes, select a control. Let's start with Label1.
  • So click on Label 1
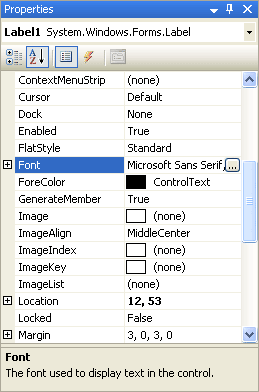
  • Scroll down the Property Box until you see Font
  • Click on the word "Font" to highlight it
  • MS Sans Serif is the default Font
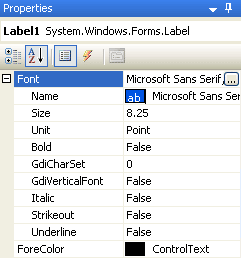
Notice that the Font property has a cross next to it. This indicates that the property is expandable. Click the cross to see the following:
Font Properties in NET
Notice that the Font property has a cross next to it. This indicates that the property is expandable. Click the cross to see the following:
As you can see, you can change a lot of Font properties from here: the Name of the font, its Size, whether is should be Bold or not, etc. You can also click the square box with the three dots in it. This brings up a dialogue box where you can change the font properties in the same place.
Make the following changes to the three labels:
Font: Arial
Font Style: Bold
Font Size: 10
Change the Font of the three Textboxes so that they are the same as the Labels.
When you're finished, you should have a form that looks a little more like a real programme. Time now to save your work. Click below to see how to do this in VB .NET.

Changing the values of some properties is fairly easy. We'll now change the Text properties of our labels, and the Text properties of our Textboxes.
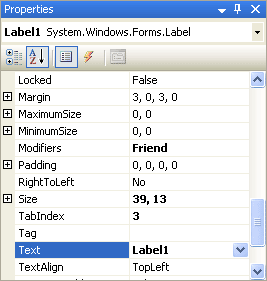
Click on Label1 so that it has the sizing handles, and is therefore selected. Examine the Property box for the Label:
Label Property in NET
You can see that the Label control has quite a few different properties to the Form control. Think back to your television as an control. It will have different buttons and knobs to your DVD Player control. A label has different "buttons and knobs" to the Form's "buttons and knobs".
But the Label has a lot of properties that are the same. The Text property of a Label does what you'd expect it to do: adds text to your label. We'll do that now:
  • With label1 selected, click inside the area next to "Text", and delete the word "Label1" by hitting the backspace key on your keyboard
  • Type in the words "First Name"
  • Click back onto the grey form, or hit the return key on your keyboard
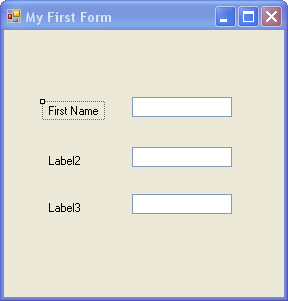
  • Label1 has now changed its text caption to read "First Name"
  • If you've made a typing error, go back to the first step above and try again
  • Your form should now look like this:
Label and Form
Now, change the Text property of the other two labels. Change them to these values:
Label2: Last Name
Label3: Telephone Number
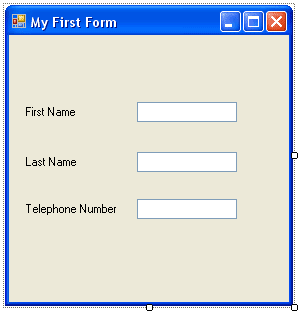
What you should notice is that the labels resize themselves, after you press the enter key to commit the changes. You may need to drag your labels to the left a bit. But when you're finished, your form should look like ours below:
A Label on a VB Form
The form might look a little squashed, though. Is there anything we can do to make it bigger? Well, it just so happens there is.
The Form can be resized just like the Label and the textboxes. Click anywhere on the form that is not a textbox or a label. If you look closely around the Form's edges, you'll notice our old friends the sizing handles. To make the form bigger, just stretch them like you did the labels and the textboxes. Play around with the size of the form until you're happy with it. You can now reposition and resize the textboxes and labels so that things don't look too squashed. Your form might look like this one:
Form Resized
Click on Debug > Start to have a look at your programme. Or Press F5 on your keyboard. ClickDebug > Stop Debugging to get back to the design environment. (Or press Shift + F5, or just click the red X at the top right of the form.)
Now, lets add a splash of colour to our form.

You've probably noticed the area to the right of the design environment, the area with all the textboxes in a grid, the one that has those daunting names like "AccessibleDescription", "AccessibleName", "AccessibleRole". That's the Properties box.
Click anywhere on the form that is not a label or a textbox, somewhere on the form's grey areas. The form should have the little sizing handles now, indicating that the form is selected.
On the right of the design environment there should be the following Properties box:
The Properties area in VB NET
If your Properties box says "Textbox1 Textbox" or "Label1 Label" then you haven't yet selected the Form. Click away from the textbox or label until the Properties box reads "Form1 Form"
What you are looking at is a list of the properties that a form has: Name , BackColor, Font, Image, Text, etc. Just to the right of these properties are the values for them. These values are the default values, and can be changed. We're going to change the value of the Text property.
First, you might want to display the list of Properties in a more accessible form. You can display the list properties alphabetically. To do that, click the Alphabetic icon at the top of the Properties box, as in the image below:
This will make the properties easier to find.
Before we change any in the Properties box, let's clear up what we mean by "Property".


What is a Property?

Those controls you added to the form (textboxes and labels), and the form itself, are called control objects. You can think of controls as things, something solid that you can pick up and move about. Controls (things) have properties. If your television were a control, it too would have properties: an On/Off button property, a colour property, a volume property, and a ... well, what other properties would your television have? Think about it.
The properties of your television will have values. The On/Off button would have just two values - On or Off. The volume property could have a range of values, from zero to ten, for example. If the value of the volume property was set to ten, the loudest value, then you'd probably have some very angry neighbours!
In VB.NET, you can change a property of a control from the Properties Box. (You can also change a property using code, which you'll do quite a lot.) If we go back to our Form object, and the properties and values it has, we can see how to change them using the Properties Box. We'll change only one of these values for now - the value of the Text property . So, do this:
  • Locate the word "Text" in the Property box, as in the image below
"Text" is a Property of Form1. Don't be confused by the word "Form1" next to the word "Text". All this means is that the current value of the Text property is set to the word "Form1". This is the default.
To change this to something of your own, do this:
  • Click inside the area next to "Text", and delete the word "Form1" by hitting the backspace key on your keyboard
  • When "Form1" has been deleted, type the words "My First Form"
  • Click back on the form itself (the one with the labels and textboxes), or hit the return key on your keyboard
  • The words "My First Form" will appear as white text on a blue background at the top of the form
When you've correctly changed the Text property, your Form will then look like this one:
As you can see, your new text has gone at the top of the form, in white on the blue background.
So the Text Property of a form is for setting the caption you want to display in the title bar at the top.
In the next part, we'll take a look at how to change the text property of labels and textboxes.

Let's start by adding a textbox to our form. (The following screenshots are taken from the more colourful previous versions of Visual Studio Express. Version 2012 is rather grey and bland. So don't worry that you forms don't look exactly the same, if you have this version.)
With the Common Controls displayed, do the following:
  • Locate the TextBox tool
  • Double click the icon
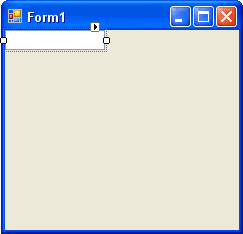
  • A textbox is added to your form
The textbox gets added to the top left position of your form. To move it down, hold your mouse over the textbox and drag to a new position:
VB NET Form with One TextBox
Notice the small squares around the textbox. These are sizing handles. Move your mouse over one of them. The mouse pointer turns into an extended line with arrowheads. Hold your left mouse button down and drag outwards. The textbox is resized. Play around with the sizing handles until you're happy with the size of your textbox.
One thing you will notice is that you can't make the size any higher, but you can make it wider. The reason why you can't make it any higher is because the default action of a textbox is to have it contain only a single line of text. If it's only going to contain one line of text, Microsoft reasoned, there's no reason why you should be able to change its height. A textbox can only be made higher if it's set to contain multiple lines of text. You'll see how to do this soon.
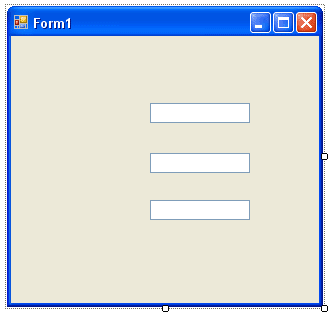
  • Create two more textboxes by double clicking on the textbox icon in the toolbar (Or Right-click on the selected textbox and choose Copy. Then Right-click on the Form and choose Paste.)
  • Resize them to the same size as your first one
  • Line them up one below the other with space in between
  • Try to create something that looks like the one below
Three Texboxes on a VB NET Form


Adding a Label to your Form

Let's add some labels near the textboxes so that your users will know what they are for.
  • Locate the label control in the toolbox
  • Double click the label icon
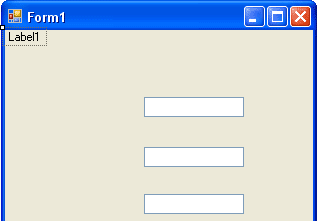
  • A new label is added to your form
  • It should look like the one below
Add a Label to your VB NET Form
Click on the label to select it. Now hold your left mouse button down on the label. Keep it held down and drag it to the left of the textbox.
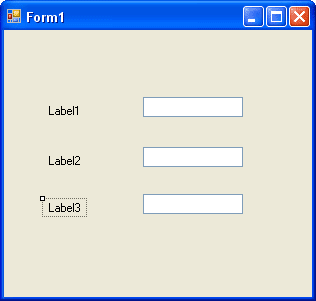
Create two more labels, and position them to the left of the textboxes. You should now have a form like this one:
Three Labels on the Form
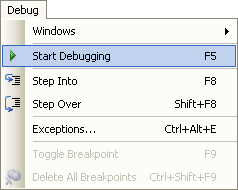
To see what your Form looks like as a programme, click Debug > Start from the menu bar. Or press F5 on your keyboard:
The Debug menu in VB NET
To stop the programme from running, you can do one of the following:
1. Click the Red X at the top right of your Form
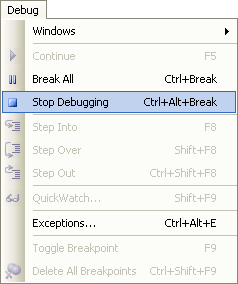
2. Click Debug > Stop Debugging from the menu bar
3. Press Shift + F5 on your keyboard
Stop Debugging
You can also click the Stop button on the VB toolbars at the top, as in the image below:
All right, we're getting somewhere. We now have a form with textboxes and labels, something that looks like a form people can fill in. But those labels are not exactly descriptive, and our textboxes have the default text in them. So how can we enter our own text for the labels, and get rid of that default text for the textboxes?
To do those things, we need to discuss something called a Property.

http://www.homeandlearn.co.uk/NET/nets1p4.html
Things like buttons, textboxes, and labels are all things that you can add to your Forms. They are know as Controls, and are kept in the Toolbox for ease of use.
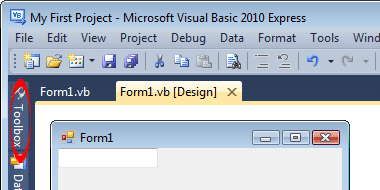
The Toolbox can be found on the left of the screen. In the picture below, you can see the toolbox icon next to Form1 (VB Net 2008):
The Visual Basic .NET Toolbox
VB Net 2010:
The toolbox in VB NET 2010 Express
VB NET 2012:
VB NET 2012 toolbox
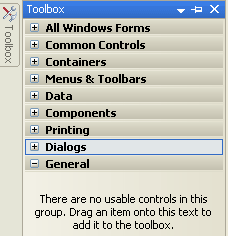
To display all the tools, move your mouse over the toolbox icon. You'll see the following automatically appear (the 2012 version looks similar to the one on the right, below):
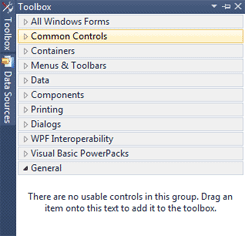
ToolBox Categories     The toolbox in VB NET 2010
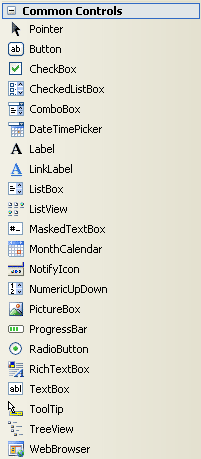
There are seven categories of tools available. The toolbox you'll be working with first is the Common Controls toolbox. To see the tools, click on the plus symbol next to Common Controls. You'll see a long list of tools:
Common Controls in the VB ToolBox
As you can see, there are an awful lot of tools to choose from! For this first section, we'll only be using the Button, the TextBox and the Label.
If you want to keep the toolbox displayed, click the Pin icon next to the X. To close the toolbox, simply move your mouse away. Or just click the word Toolbox again in version 2012.
In the next part, we'll see how to add a textbox to the form.

In the Visual Basic NET design time environment, the first thing to concentrate on is that strange, big square in the top left. That's called a form. It's actually the pretty bit of your programme, the part that others will see when they launch your masterpiece. Granted, it doesn't look too attractive at the moment, but you'll soon discover ways to lick it into shape.
To run the form, try this:
  • From the menu bar, click Debug
  • From the drop down menu, click Start
  • Alternatively, press the F5 key on your keyboard
  • Your programme is launched
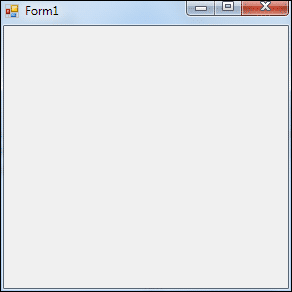
Congratulations! You have now created your very first programme. It should look like this:
A VB NET Form Running as a Programme
Click the Red X on the form to stop it from running. You will then be returned to the software environment.
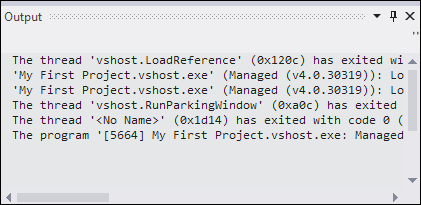
If you look at the bottom of the screen, you'll see an Output Window in Version 2012 of the VB software:
The Output window in Visual Studio Express 2012
You can get rid of this by clicking the pin or the cross on the right-hand side:
Close the Output window
If you compare the form when you create a new project with the one above when its running, you'll see that they look very similar. But the one above is actually a real programme, something you could package and sell to unsuspecting village idiots.
So what's going on? Why the two different views? Well, Visual Basic has two distinct environments, aDesign environment and a Debug environment. Design Time is where you get to play about with the form, spruce it up, add textboxes, and buttons, and labels (and code, of course ); Debug is where you can test your programme and see how well it performs. Or doesn't perform, as is usually the case.
But don't worry about the terminology, for the time being. Just be aware that there's a two step process to VB programming: designing and debugging.
So, let's get on and do some designing! Before we can start designing a form, though, we need some tools. And where are tools kept? In a toolbox!
Click below for the next lesson (unless you fancy buying our VB .NET book!).

http://www.homeandlearn.co.uk/NET/nets1p2.html
Launch your Visual Basic .NET or Visual Studio software. When the software first loads, you'll see a screen something like this one, if you have the 2008 version:
Or this one, for VB NET 2010 users:
If you have VB NET 2012, your opening screen will look like this:
There's a lot happening on the start page. But basically, this is where you can start a new project, or open an existing one. The first Tab, Projects, is selected. At the moment, the area labelled "Open an Existing Project" is blank. This is what you'll see when you run the software for the first time (because you haven't created a project yet). When you create a project, the Name you gave it will be displayed on this page, as a hyperlink. Clicking the link will open the project.
At the bottom of the screen, there are two buttons: "New Project" and "Open Project". To get started, click the "New Project" button. When you do, you'll see this dialogue box appear in the version 2008:
Start a New Project dialogue box, Visual Studio Express 2008
Or this one for version 2010:
New Project dialogue box in Visual Studio 2010
In the 2012 version, you'll see this:
The New Project dialogue box in Visual Studio Express 2012
As a beginner, you'll normally want the option selected: "Windows Application", in the "Visual Basic Projects" folder. This means that you're going to be designing a programme to run on a computer running the Microsoft Windows operating system.
If you look in the Name textbox at the bottom, you'll see it says "WindowsApplication1". This is the default name for your projects. It's not a good idea to keep this name. After all, you don't want all of your projects to be called "WindowsApplication1", "WindowsApplication2", etc. So click inside this textbox and change this Name to the following:
My First Project
Keep the Location the same as the default. This is a folder inside of your "My Documents" folder called "Visual Studio Projects". A new folder will then be created for you, and its name will be the one you typed in the "Name" textbox. All of your files for your first project are then saved in this folder.
Click the OK button, and the Visual Basic NET design time environment will open. It will look like the following (version 2008):
Or this, in version 2010:
The Design environment in VB NET 2012 is this:
That's a very daunting piece of software, hey? Well, don't worry. We'll break it down bit by bit in the next few sections, and pretty soon you'll be zipping your way around it like a pro!

23 Haziran 2013 Pazar

CD ve DVD Devrine Son
CD ve DVD devri kapanıyor mu? Bu iddia giderek kendini hissettiren bir gerçeğe dönüşmekte.  Bütün oyun konsollarında, laptoplarda, masaüstü bilgisayarlarda veri girişi için aracı kaynak olan DVD ve CD’lerin yerini alabilecek donanım merakla beklenmekte. Bilgisayar kullanıcılarının CD ve DVD kullanımını daha az tercih etmeye başlaması da CD ve DVD’lerin ömrünün sonu ermesi sürecinde katalizör görevi görüyor adeta.
Sony, kullanıcıların bu tercih değişikliğini fark etmede bir adım öne geçmiş durumda. Bu durum karşısında Sony önümüzdeki aylarda CD ve DVD sürücüsü üretimini durdurmayı planlıyor bu departmanın Sony tarafından kesin kapatılış tarihi ise Mart 2013 olarak öngörülüyor. Eskiden atari oyunları oynerken kasetler vardı ve şimdi onların yerine alan CD’lerin de devri tıpkı kasetler gibi sona eriyor. Microsoft’unda yeni nesil XBOX oyun konsolunda DVD girişi olmayacağı söylentileri de giderek daha yüksek sesle dillendirilmekte. Microsoft’un yeni nesil XBOX cihazlarında bir SSD sürücü olacağı öne sürülüyor. Bu da XBOX cihazlarında bir kart yuvasının olacağı anlamına geliyor ama bu yuvanın standart SD girişi mi olacağı yoksa Microsoft’un yeni bir tasarımımı olacağı konusunda belirsizlik sürmekte.


LikesWin Kode:20199413
Sony PlayStation tutkunları Gamefest de buluştu
Sony tarafından düzenmiş olan Türkiye’nin ilk olarak resmi PlayStation Festivali Maslak Refresh The Venue’de başladı. Yüzlerce oyun severlerin büyük ilgi gösterdiği festival kapsamı içerisinde, Sony’nin efsaneleşmiş oyunlarının yanı sıra FIFA13 ve PES13 turnuvalarında oyuncular kıyasıya rekabet ederek eğlenceli zamanlar geçirdi.
2 gün devam edecek olan festival oyun severlerine birbirinden eğlenceli etkinlikler sunuyor. Sabahın erken saatlerinde sıraya giren oyun severler kuyruğa girip kayıt yaptırdıkları festivale binlerce kişi büyük ilgi göstererek rekabet heyecan anlar yaşıyorlar.
Sony; sadece bir oyun festivali olmaksızın müzik eğlencenin de bir arada doyasıya yaşandığı bir gençlik festivali havasını veriyor. Festival müzik gruplarında liseli amatörlerin ve dans gruplarının da performansını sergileyeceği bir sahne yer alıyor. Böylece gençlerin müzik ve dans adına yaptığı çalışmalar yansıtılarak eğlence atmosferleri oluşturuluyor. Ayrıca festivalde sürprizler bitmiyor.

21 Haziran 2013 Cuma

Samsung Ultrabook oh Samsungdan Yüksek Piksel Çözünürlüğüne Sahip Üst Seviye Ultrabook
Ultrabook dünyasının iddialı oyuncularından Samsung, Londra’da düzenlediği Premiere 2013 etkinliği çerçevesinde, üst seviye yeni ultrabook modeli olan ATIV Book 9 Plus’ı duyurdu. Güney Kore merkezli üreticinin en dolu modeli olan yeni ultrabook, 13.3-inç büyüklüğünde ve 3200 x 1800 piksel çözünürlüğündeki ekranı ile dikkatleri üzerine çekmeyi başarıyor. Windows 8 işletim sistemini kullanan ve Intel platformundan güç alan yeni Ultrabook’ta, Haswell mimarisinden güç alan çift çekirdekli Core i5-4200U işlemcisi kullanılıyor. Aynı zamanda sistemin grafik yükü de işlemciye entegre HD 4400 entegre grafik biriminden sağlanıyor. Yüksek oyun performansı beklenmemesi gereken grafik birimi, günlük işler ve video hızlandırma için gerekli performansı sağlamakta ise herhangi bir sıkıntı yaşamıyor.
Bellek kapasitesi 8GB olarak açıklanan ve depolama için 256GB SSD sürücüsüne yer verilen ATIV Book 9 Plus, 13.6mm kalınlığı ile böylesi bir donanımı ultra-ince bir kasa içerisine sığdırmayı başarıyor. 1.39Kg ile aynı zamanda hafif te bir bilgisayar olan yeni Ultrabook, 12 saate kadar pil ömrü sunmayı da başarıyor. Bu açıdan bakıldığında daha yüksek çözünürlüklü ekranına rağmen, Apple’ın MacBook Air modelleri kadar pil ömrü sunacak gibi görünüyor. Kart okuyucusu, iki adet USB 3.0 portu, microHDMI ve miniVGA konnektörlerü ile adaptör üzerinden RJ45 kablolu internet bağlantısı, mikrofon ve kulaklık girişi gibi detaylara sahip olan ultrabook, şu anki bilgiler doğrultusundan en azından ilk etap için siyah renk seçeneği ile pazara girecek gibi görünüyor. Benzer ekran çözünürlüğüne sahip bazı Ultrabook modelleri daha önce lanse edilmiş olsa bile, Samsung ATIV Book 9 Plus, muhtemelen dünya genelinde sunulan ilk QHD+ Ultrabook modeli olacak. Fiyata gelirsek, Samsung’un en donanımlı Ultrabook modeli olan ATIV Book 9 Plus’ın, Avrupa’da 1500 Avro civarı bir fiyatla sunulması bekleniyor.
instagram Instagramda artık bunu yapabileceğiz

Instagram’ın CEO’su Kevin Systrom, artık Instagram’avideo de ekleneceğini duyurdu.
Ücretsiz fotoğraf paylaşma programı olan Instagram, Ekim 2010’da kurulduğunda, kullanıcılarına çektikleri bir fotoğraf üzerinde dijital filtre kullanma ve bu fotoğrafı Instagram’ın da dahil olduğu, sosyal medya servisleri ile paylaşma imkanı tanımıştır. 1 Nisan 2012 tarihinde Facebook, Instagram’ın şirketi ve 13 çalışanını yaklaşık 1 milyar dolar nakit karşılığında satın aldı.

19 Haziran 2013 Çarşamba

missionegg Google Playde Yeni Bir Türk Oyunu!
Son dönemlerde Türkiye geliştiği gibi Türk oyun sektöründede oldukça büyük gelişimler kat edilmeye başladı.Hasan Çimen isimli bir Türk oyun geliştiricisinin yaptığı “Mission Egg” isimli oyun Perşembe günü Google Play’deki yerini alacak.Ay sonunda ise Windows 8 ve Windows Phone için çıkış yapacak.
İyi seyirler ;

Fifa 14 Messi FIFA 14 Yeni Nesil Konsollarda 1080pde 60 FPS ile Oynayacak!
EA Sports firmasının yeni nesil futbol oyunu FIFA 14 Xbox One ve Playstation 4 sürümlerinde yeni oyun motoru Ignite Engine ile geliştirilmeye devam ediyor. Oyunun yeni nesil sürüme ait memnun edici bilgiler ise yayınlanmaya devam etmkete.
FIFA serisinin şimdiki nesil konsollarda 720p olarak çalıştığını açıklanmıştı. Yeni nesil konsollarda ise oyun gelişmiş grafikler ile birlikte 1080p olarak 60 FPS ile oynanacak.
Battlefield 4 oyunuda Xbox One ve PS4′de 1080p ile 60 FPS hızında çalışması isteniyor ve çalışmalar devame diyor.Bu durum son kullanıcılar için ise oldukça heyecan verici bir haber.

18 Haziran 2013 Salı

asus rog tytan cg8890
Asus, birçok donanımını kendisi üreten, dünyanın en büyük teknoloji firmalarından biri. Hal böyle olunca bu parçalar bir araya gelip neredeyse tam bir sistem oluşturabiliyor. Hedef kitle de oyuncular ve yüksek performans arayanlar olunca ortaya en üst seviye bir kasa çıkabiliyor. Asus ROG Tytan CG8890 da bu oluşumu en iyi özetleyen ürün. Özellikle teknolojiyle haşır-neşir olanlar tarafından pek sevilmeyen "hazır sistem" tabusunu tek hamlede yıkıyor.
                  ÖZELLİK TABLOSU Asus ROG Tytan CG8890
İşlemci Intel Core i7 3960X
Anakart Asus Rapmage IV Extreme (Intel X79)
Bellek 4x4 Gb 2133 Mhz
Grafik Kartı Asus GTX690
Depolama 2x 128 Gb Sandisk SSD (RAID0)
3 Tb HDD
Ses Asus Xonar Phoebus
Optik Sürücü Blu-ray yazıcı
24x DVD yazıcı
Güç Kaynağı 900 W
Ön Çıkışlar 16-in-1 kart okuyucu
2x USB3.0
2x USB2.0
Kulaklık
Mikrofon
Arka Çıkışlar 4x USB3.0
6x USB2.0
2x eSATA
PS/2 klavye/fare
Gigabit LAN
8 kanal analog ses
S/PDIF
Boyutlar 300 x 530 x 630 mm
Ağırlık 24 Kg

CG8890, daha önce incelediğimiz CG8580'le neredeyse aynı tasarıma sahip. Tamamen kapalı kutu şeklinde dizayn edilmiş. Gerçekten harika duruyor. CG8580'e nazaran en büyük farkı, özel soğutma sistemi nedeniyle kalınlaşan kapakları. Genel keskin hatlara ve üçgen kıvrımlara sahip. Oldukça geniş, hatta tombul denilebilir. Bu nedenle biraz hantal. Ancak yine de bakanın dönüp tekrar bakacağı cinsten bir kasa.
asus rog tytan cg8890 06asus rog tytan cg8890 07asus rog tytan cg8890 08asus rog tytan cg8890 09
Mat bir yüzeyi var, füme renginde. Bu yapı tamamen sert plasikten imail edilmiş. İç ksım ise çelik. Mat olması nedenilye çizilmelere ve parmak izlerine biraz daha dayanıklı. Tamamen simetrik bir yapıda tasarlanmış.
asus rog tytan cg8890 10asus rog tytan cg8890 11asus rog tytan cg8890 12asus rog tytan cg8890 13
Gelelim ürünü en özel kılan noktaya. Özel soğutma sistemi, üst kısımdaki Speed butonuna bastınızda aktif hale geliyor. Yan kapanlardan ve üst kısımdan açılan toplam 8 adet fanla, hava akımına destek olunması amaçlanıyor. Otomatik kapaklar, kısa bir zamanda açık hale gelebiliyor. Bu özellik, eşine rastlamadığımız ve CG8890'ı farklı yapan noktalardan biri.
asus rog tytan cg8890 14asus rog tytan cg8890 15asus rog tytan cg8890 16asus rog tytan cg8890 17
Açılma sırasında gürültülü diyebileceğimiz bir mekanik sesi geliyor. Kapaklar son derece sağlam. Açık konumdalarken bile herhangi bir sorun çıkma riski bulunmuyor. Bu denli üst seviye ürün için zaten sağlamlık olmazsa olmaz.
Soğutma sistemi ilginç, ayrıca harika görünüyor. Ancak ne kadar etkili orası biraz tartışılır. Zira fanlardan gelen hava akımı, metal aksamdan geçmekte zorlanıyor. Bunun nedeni, yan metallerde yeteri kadar ızgara olmaması. Sadece ekran kartı alanından içeri girebilme imkanı var. Ancak hava akımı oraya gelene kadar gücünün büyük kısmını kaybediyor. Fanlar ince yapıda. Çok yüksek hava akımı sağlayamıyorlar.
asus rog tytan cg8890 18
Üst kısımda bu sorun yok. Geniş bir ızgaralı alan bulunuyor ve ısınan hava buradan tahliye ediliyor.
asus rog tytan cg8890 19
Soğutma sisteminin yanı sıra tasarım anlamındaki bir diğer vurucu nokta da ışıklandırmalar. Sistemin çalıştığı andan itibaren parlamaya başlıyorlar. İşlemci stok hzıdayken mavi, hızaşırtma durumunda kırmızı parlayan logo ve alt bölmeyle özellikle geceleri seyrine doyulmuyor. Kapaklardaki fanlar da LED'li olsaydı sanırız görenlerin ağzı açık kalırdı.
asus rog tytan cg8890 20asus rog tytan cg8890 21asus rog tytan cg8890 22asus rog tytan cg8890 23
Kullanıcı panelinde 2 adet USB3.0, 2 adet USB2.0, kulaklık/mikrofon ve güç/speed düğmeleri bulunuyor. En üstte oldukları için ulaşmak çok kolay. USB portları arasındaki boşluk yeterli, takacağınız ürünler birbirlerinin alanına sarkmıyor.
asus rog tytan cg8890 24
Güç düğmesi sağda. Çalışırken beyaz parlıyor.
asus rog tytan cg8890 25
Sol kısımda güçle simetrik yapıda bir Speed butonu mevcut. Bu tuşa basarak işlemci anında hızaşırtılıyor ve daha yüksek saat hızlarında çalışıyor. İster masaüstünde ister oyunda olun, herhangi bir ek ayar yapmadan bu özelliği kullanmak mümkün. Intel Core i7 3960X'in referans hızı olan 3.3 GHz zaten bize 3.6 GHz olarak sunuluyor. Tuşa basarak bunu 3.8, 4.0 ya da 4.2 GHz'e çekmek mümkün. Hangi hıza çıkacağını BIOS'tan seçmek gerekiyor. Ayrıca bu geçişlerde ekrana bir animasyon giriyor ve kullanıcıya o anda hangi hızda çalıştığı bildiriliyor.
asus rog tytan cg8890 26
Ön yüz, Asus'tan daha önceki hazır sistemlerinde gördümüz bir kapakla saklanmış. Fakat bu sefer açılma işlemi mekanik tutulmuş, kendi kendine yapıyor. 5.25" sürücü yuvalarının görüntüyü bozmaması açısından oldukça başarılı bir hamle.
Toplamda 3 adet yuva mevcut, bunlardan 2 tanesi dolu. Diğeri kullanıcıya bırakılmış. En üstte Blu-ray/DVD/CD yazıcı mevcut. Altında da hot-swap disk yuvası var. Buraya herhangi bir 3.5" depolama birimini tak-kullan şeklinde monte edebilirsiniz. Ayrıca kilitleme özelliği de mevcut.
Bir diğer detay da hafıza kartı yuvaları. Birçok farklı versiyonu kullanmak mümkün.
asus rog tytan cg8890 27asus rog tytan cg8890 28asus rog tytan cg8890 29asus rog tytan cg8890 30
Kapağın açılma mekanizması oldukça eğlenceli.
Kasanın tombul yapısı gereği üstte geniş bir alan var. Burayı eşya koymak için kullanabilirsiniz. O kadar büyük ki, mouse pad koyup kullanmak bile mümkün.
asus rog tytan cg8890 79
Arka tarafa baktığımızda özel bir ayrıntı görmek mümkün değil. Sıradan anakart ve grafik kartı çıkışlarının yanı sıra ses ve kablosuz ağ kartının yuvaları da mevcut. İşlemciyi soğutan radyatörün ve fanının takıldığı bir 12 cm'lik fan yuvası var.
asus rog tytan cg8890 31
Alt kısmı merak edenler için; önemli bir detay bulunmuyor.
asus rog tytan cg8890 32
Işıklandırma sistemi 3 adet LED'den oluşuyor. Güzel bir parlama efekti için desenli bir pleksi yerleştirilmiş.
asus rog tytan cg8890 33

Kapağı kaldırdığımızda, dış yüzey her ne kadar özel dursa da iç aksamın doğal olarak bir midtower olduğunu görüyoruz. Çelik malzeme kullanılmış.
Alan kısıtlı olsa da Asus çalışanları güzel denilebilecek bir kablo düzenlemesi yaratmış. Tüm parçalar itinalı şekilde monte edilerek taşınma sırasında herhangi bir sorun olması önlenmiş. Ortalıkta sallanan kablolar bulunmuyor. Parçalar, CG8890'a özel olarak seçildiği ya da üretildiği için fazla ya da eksik bir noktası bulunmuyor.
asus rog tytan cg8890 34
İşlemci tarafında Intel'in amiral gemisi Core i7 3960X kullanılmış. Extreme sınıfındaki bu işlemci, 6 doğal çekirdeğin üzerine Hyper-Threading ile toplamda 12 izlek sunuyor. Yüksek performansı zaten çıktığı günden itibaren kendini belli ediyor. Bunun üzerine eklenen hızaşırtma ile daha da ileriye taşınmış. İşlemcinin referans saat hızı 3.3 GHz. Siz Speed butonuna basmasanız bile 3.6 GHz olarak çalışıyor. Yani her türlü kullanımda bir frekans artışı mevcut.
Kullanılan anakart da firmanın en üst seviyesi; Rampage IV Extreme. X79 yongasetinden güç alıyor ve 4 kanal bellek sunuyor. CG8890 için hafif şekilde oynanmış. Örneğin BIOS'a girdiğinizde hızaşırtma bölümü yok. Bunun nedeni kasanın hazır hızaşırtma düzeninin bozulmaması.
asus rog tytan cg8890 35
İşlemci soğutucusu olarak tak-kullan sıvı soğutma sistemi tercih edilmiş. Birçok firmaya üretim yapan Asatek tarafından imal edilmiş. Radyatörü biraz ince ancak bunu dev Delta fanla telafi etmiş. Soğutmaya ilgisi olanlar hemen tanıyacaktır, Delta fanlar üstün soğutma kapasiteleriyle en iyiyi isteyen kullanıcılar tarafından sıkça tercih edilmekte. Yeri geldiğinde yüksek çalışma hızlarına çıkarak soğutmaya büyük destek oluyorlar.
asus rog tytan cg8890 36
Kullanılan bellekler, G.Skill'in Ripjaws Z modeli. 4 adet modül bulunuyor ve her biri 4 Gb kapasitede. Yani toplamda 16 Gb'a ulaşılmış. 2133 Mhz çalışma frekansları var.
asus rog tytan cg8890 80
Donanımlar arasında en dikkat çekeni ve en pahalısı GTX690. Çift GPU'su ve sunduğu üst seviye performansıyla CG8890'ı oyun canavarı haline dönüştüren yegane güç. Uç kısımda bir metal yardımıyla destek sağlanmış.
asus rog tytan cg8890 37
Güç kaynağı 900W ancak ne bir logo ne de ek bir bilgi yer alıyor. 80Plus olarak belirtilmiş ancak bu sertifikanın da derecesi belirtilmemiş. Kasaya özel üretildiği çok belli.
asus rog tytan cg8890 38
Kapaklardaki fanlar her zaman çalışmıyor. Siz Speed tuşuna bassanız bile sıcakık sorunu yoksa dönmüyorlar. Ortam hararetlendikçe duruma göre hızları artıp azalabiliyor. İşte bu kontrolü gerçekleştiren devre fotodaki. Fanlar üzerine takılıyor ve hangi şekilde çalışacaklarına o karar veriyor.
asus rog tytan cg8890 39
İşletim sistemi için Sandisk'in 128 Gb kapasiteli 2 adet SSD'si tercih edilmiş, yine modeli söylenmemiş. RAID0 kombinasyonundalar ve gerçekten çok hızlılar. Depolama içinse 3 Tb'lık bir sabit disk bulunuyor.
asus rog tytan cg8890 78
CG8890, önceki konuğumuz CG8580'le genel mantık olarak neredeyse aynı. Bu nedenle genel yorumumuz da benzer olacak.

Performans

Sınıfının en iyileri arasında yer alan ürünler tercih edilmiş. Hal böyle olunca hepsi birleşip Voltran'ı oluşturuyorlar ve ortaya üzerine atılan her yükü rahatlıkla kaldırabilecek bir sistem çıkıyor. İster oyunlarda ister render gibi işlerde kullanıcısını yarı yolda bırakmamak için üretilmiş.

Daha yüksek performans

Fabrikadan hızaşırtılmış olarak gelen işlemcisi, stok hızda çalışanlara nazaran daha yüksek performans sergiliyor. Hatta Speed tuşuyla 4.2 GHz'e çıkmak da %100 garantili. Harici alınan bir Intel Core i7 3960X'in bu değere çıkması kesin değil. Asus işlemcileri test ederek sistem içersine yerleştiriyor.

Daha da yüksek performans

Seçilen donanımlara tekrar bakın, sizce de dudak uçuklatmıyor mu? :)

Uyumluluk

Sahip olduğu tüm donanımlar, kullanıcıya sunulmadan önce test edilip onaylanıyor ve tam uyumluluk garanti ediliyor. Örneğin benzer bir sistem kurduğunuzda neredeyse her parçada uyum sorunu yaşama riskiniz mevcut. Bu sorun soket uyuşmaması gibi değil de, anakartın bellek seçmesi olarak düşünülebilir.

Kalite

Asus'un ürünlerinde tercih ettiği yüksek malzeme ve üretim kalitesinin yanı sıra mühendislik de had safhada.

Aç-kullan

İçersinde işletim sistemi, gerekli uygulamalar hatta ek programlar yüklü şekilde geliyor. Siz aldığınızda sadece fişe takıp çalıştırıyorsunuz.

Servis

Kasa içersindeki tüm bileşenler ve ek parçalar 3 yıl garantiye sahip.

Tasarım

Asus ROG Tytan CG8890'ın kasası gerçekten harika bir tasarıma sahip. Keskin hatları ve mat rengiyle ağırlığını ortaya koyan bir yapısı var. Özel ışıklandırmasını da işin içine katınca eşine pek rastlanmayan bir güzellik çıkıyor ortaya. Kesinlikle masa altında saklanacak bir model değil. Masanızın üstünde sergilenmesi gerekir.

Soğutma sistemi (?)

Özel açılır soğutma sistemi, başka benzeri olan birşey değil. Ürüne çok yüksek albeni kattığı bir gerçek. Ancak işlevsellik anlamında fark yaratacağını düşünmüyoruz.

Ayrıcalık

Birçok parçası piyasada satılmıyor. İstediğiniz kadar para dökün ancak bu şekilde toplu almadıktan sonra sahip olamıyorsunuz. Kasa, PSU ve SSD'ler özel olarak üretilmiş durumda. Yani bunları sizinle paylaşan milyon tane insan yok. Zaten Tytan CG8890'ın ülke içindeki satışı da oldukça az sayıda. Ayrıcalıklı bir kesim içine girmiş oluyorsunuz.

Herşey güllük gülüstanlık değil elbette. Gözümüze çarpan noktaları da bulunuyor. Yine CG8580'de olduğu gibi gürültüsü eksi bir özelliği. Sistem boştayken pek rahatsız etmiyor ancak işlemci ya da ekran kartını yüke sokarsanız sesli çalışmaya başlıyor. Referans tasarımlı ekran kartlarının oyunlarda gürültülü çalıştığı herkesçe bilinen bir gerçek. Bununla beraber yüksek devirlere çıkabilen Delta fanlar, ısınan işlemciyi soğutmak adına sessizliği yırtıp atabiliyor. İnce radyatör/kalın fan ikilisi yerine kalın radyatör/ince fan daha başarılı olabilirmiş.
Listenin devamında gösterişli soğutma sistemi geliyor. Evet hem artı hem de eksi hanesine giren bir özelliği... Uzaktan bakıldığında işlevsel gibi dursa da davulun sesi yakınlaştıkça güzel gelmiyor. Özellikle yan kapaklardaki fanlar, sundukları hava akımını kasa içine iletmekte büyük zorluk çekiyorlar. Hem geçebilecekleri havalandırma delikleri çok az hem de performans açısından muazzam değiller.
Kasa son derece ağır, 20 kg'dan fazla geliyor. Taşımayı kolaylaştıran bir tutma noktası da bulunmuyor. Yani transfer işlemleri oldukça eziyetli oluyor. Çelik yerine alüminyum malzeme kullanılmasını tercih ederdik.
Bir diğer eksisi de oyuncu odaklı bir model olmasına rağmen klavye üzerinde ek görev butonları yer almıyor.

360Ve gelelim dananın kuyruğunun koptuğu yere. CG8890 tam bir prestij ürünü. Taşıdığı donanımlar ve kendine has özellikleriyle bir ayrıcalık makinesi. Hal böyle olunca fiyat tarafında cüzdan yormayı bırakın, ocak yıkıyor. Türkiye'de tek satış noktası Vatan Bilgisayar ve inceleme tarihinde %30 indirimle 11.000 TL. Yanlış okumadınız...
Her ürünün alıcısı bulunuyor, CG8890'ın bile. Belki çok satmıyor ancak yine de satıyor. Herkes teknolojiyi takip etmiyor, bütçe sıkıntısı olmayabiliyor, yüksek performans arayabiliyor ya da en iyisine sahip olmalıyım diyebiliyor. İşte bu noktada CG8890'ın yıldızı parlıyor. Bu nedenle yadırgamadan önce bir düşünmek gerekiyor. Buna ek olarak aynı fiyata benzer hatta daha performanslı bir sistem kurmak tabi ki mümkün. Ancak hazır sistemlerin sağladığı ayrıcalıklar bu işlemin dışında kalıyor. Örneğin siz ne kadar isteseniz de bu kasaya sahip olamıyorsunuz. Benzer bir model olsanız dahi tek tuşla hızaşırtmaya bağlı ışıklandırma kurmak gerçekten canınızı ve kanınızı ortaya koymanızı gerektiren şeyler.
Sonuç olarak Asus ROG Tytan CG8890, en çok sahip olmayı arzulayabileceğiniz bir hazır sistem olmayı başarıyor. Hayalleri süsleyen bir canavar. Kardeşi gibi; hatta ondan da öte bir prestij sembolü...
yuksek performanstasarmyenilikci

Subscribe to RSS Feed Follow me on Twitter!